Installing a Footing Drain

A footing drain is the least glamorous part of a foundation and the one most likely to be done badly, because it is buried before anyone can see it and nobody notices until the basement is wet. It is also one of the few parts of residential foundation work with a clear code minimum attached to it.
This guide covers what a footing drain has to do, the requirements in the International Residential Code, the stone and pipe details that decide whether it still works in twenty years, and the sequencing an excavating crew needs to plan for.
What a Footing Drain Does That Grading Cannot
Surface grading moves water away from a wall. A footing drain moves water away from the base of the wall, where the footing meets the foundation, and that is a different job. Groundwater saturating the soil beside a basement wall creates hydrostatic pressure against the wall and against the joint at the top of the footing, which is where a lot of basement leaks begin.
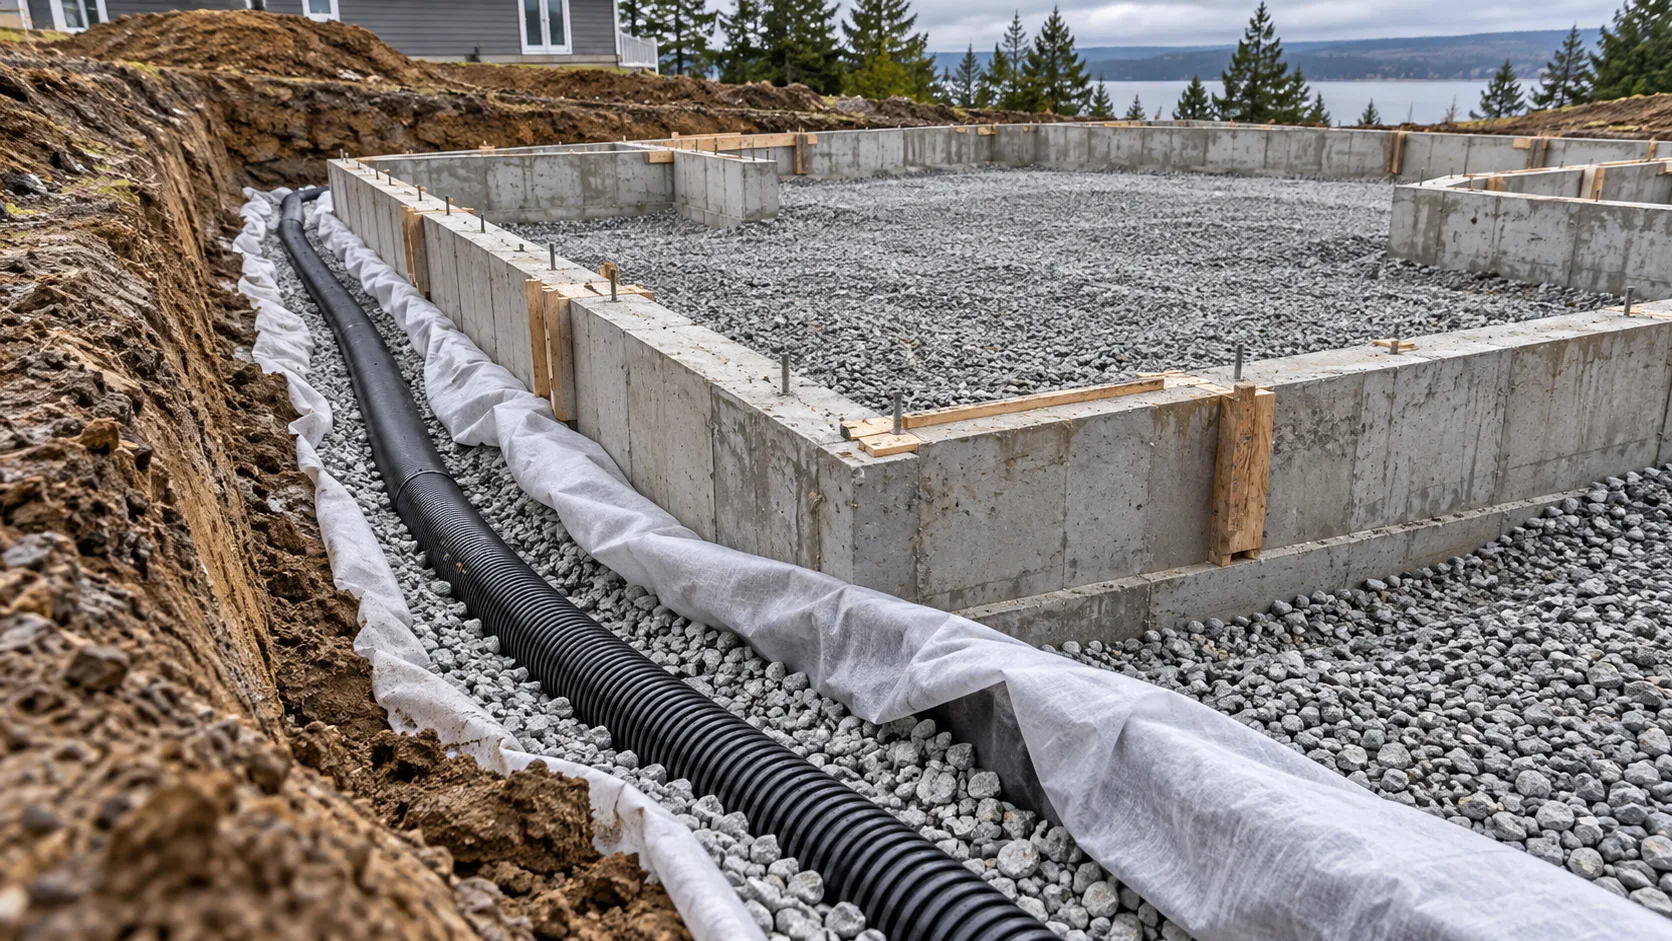
A perforated pipe laid in washed stone beside the footing gives that water somewhere to go before it builds pressure. It collects along the perimeter, flows to a low point, and leaves through an outlet. Grading handles rain that lands on the surface; the footing drain handles water already in the ground.
The Code Minimums You Have to Hit
Section R405.1 of the International Residential Code requires drains around concrete or masonry foundations that retain earth and enclose habitable or usable space below grade. Drainage tiles, gravel or crushed stone drains, perforated pipe, or other approved systems must be installed at or below the top of the footing or below the bottom of the slab, and must discharge by gravity or mechanical means into an approved drainage system.
For gravel or crushed stone drains, the stone must extend at least one foot beyond the outside edge of the footing and at least six inches above the top of the footing, covered with an approved filter membrane. Open joints in drain tile must be protected with strips of building paper.
For perforated pipe, the pipe sits on not less than two inches of washed gravel or crushed rock at least one sieve size larger than the joint opening or perforation, and is covered with at least six inches of the same material. Unless the manufacturer says otherwise, the pipe must be surrounded with an approved filter membrane, or the membrane must cover the stone that covers the pipe.
There is an exception worth knowing: a drainage system is not required where the foundation sits on well-drained ground or sand-gravel mixture soils classified as Group I in the Unified Soil Classification System, per Table R401.4.1(2). Treat that carefully. Soil changes across a lot and groundwater levels change with the season, so unless a soils report backs the call, install the drain.
Stone: Washed, Sized, and Wrapped
Washed stone is not a preference, it is the whole point. Crusher run, road base, and anything with fines will pack tight, clog the fabric, and fill the voids the water is supposed to travel through. Washed gravel in the half-inch to three-quarter-inch range is the common choice for residential footing drains.
The code's sieve-size language exists for the same reason: the stone has to be coarse enough that it will not pass through the perforations and block them. A filter membrane over the stone, or a fabric sock over the pipe, keeps soil from migrating in from the trench side. Wrap the stone completely, including under the pipe.
The fabric has to be the right fabric. A non-woven geotextile passes water and holds fines; a sheet of plastic does neither. If the material blinds over, water runs along the outside of the wrap instead of into the stone, and the drain behaves like a solid barrier. Our explainer on geogrid and geotextiles covers separation, filtration, and drainage products.
Pipe: Material, Perforations Down, and Slope
Four-inch perforated pipe is the residential standard, either rigid Schedule 40 or Schedule C PVC, or corrugated HDPE. Rigid pipe holds a line and resists crushing under deep backfill; flexible pipe is faster to install but sags if it is not supported.
Lay the pipe with the perforations down. Holes facing up collect the first flush of silt and lose capacity; holes facing down draw water from the stone bed the pipe is sitting in. The pipe belongs beside the footing, on undisturbed soil or the footing shelf, not perched on top of the footing where the wall can crush it and where it will never see the water at the base of the wall.
The code requires gravity or mechanical discharge but does not give a slope number. The field standard is about one percent, roughly one inch of fall per eight feet of run, and many installers work closer to two percent for margin. With flexible pipe, chasing a precise pitch by eye is how you create bellies, so keep the run straight and level or slightly pitched and let the outlet elevation do the work. A dip becomes a sediment trap, and a sediment trap becomes a clog.
Outlet: Daylight, Drywell, Storm, or Sump
The drain has to end somewhere useful. Gravity to daylight is the best option when the site allows it: run non-perforated pipe from the low point of the loop to a downhill discharge point at least ten feet from the foundation, where it does not dump onto a neighbour, a sidewalk, or back into the excavation.
Where daylight is not available, the options are a drywell, an approved storm connection where the local authority allows it, or a sump pit with a pump that discharges above grade and away from the building. Many jurisdictions prohibit connecting foundation drainage to the sanitary sewer, and some prohibit storm connections too, so confirm the local rule before the pipe is laid rather than after inspection.
Protect the outlet with a rodent screen or flap and a gravel apron. An outlet sitting below the surrounding grade is not an outlet, it is a pond, and it will back up the system the first time it rains hard.
Sequencing: When the Excavator Comes Back
The footing drain goes in after the footings and walls are up and before backfill, which puts it at the busiest point in the foundation schedule. The crew that dug the hole usually places the stone, sets the pipe, and backfills, so the sequence needs to be in the plan rather than improvised on the day.
Practical order: excavate, pour footings, pour or set walls, apply dampproofing or waterproofing, place the stone bed, set the pipe, wrap the stone, connect and test the outlet, inspect, then backfill in lifts. The drain goes in after the wall coating so the coating is not damaged by stone being placed against it, and before backfill so there is access.
Trench dimensions follow the pipe. A four-inch pipe with six inches of stone on each side and a protective cover typically needs a trench on the order of sixteen inches wide and sixteen inches deep, with the bottom at least ten inches below the top of the footing to keep the pipe below the slab or crawlspace floor. That is a real excavation, and it gets the same care as any other trench: protective system where required, spoil kept back from the edge, and a way out.
Inspection Before Backfill
Once backfill goes in, the only evidence left is the outlet, which makes the pre-backfill inspection the most valuable hour of the job. Walk the entire perimeter and verify invert elevations, not just that pipe exists.
- Continuous fall. Check against a laser or string line, not by eye. Look for bellies where flexible pipe crossed a soft spot.
- Perforations down. It is easy to roll a coil during installation and never notice.
- Connections. Every joint secured, every fitting seated.
- Stone depth. Two inches below, six inches above, wrapped rather than open to the trench backfill.
- Clean stone. No fines, no soil smeared into the bed, no construction debris.
- Outlet open and below the inlet. Pour a bucket of water in at the high point and watch it arrive.
- Photographs. Shoot the run with a tape in frame, the outlet, and the connections. When someone drills a deck pier through the drain in three years, the photos are the only record.
If the run is long or the foundation is complicated, a camera test before backfill is cheap compared with digging it up later.
Common Failures and How They Show Up
Most footing drain failures are installation failures, and they repeat. Missing or inadequate fabric lets fines migrate in until the stone and pipe are silted solid. Unwashed stone does the same thing faster. A flat spot or back-sloped section holds water and sediment and eventually plugs. Flexible pipe crushed under deep backfill loses its shape and capacity. An outlet buried by landscaping or covered by a patio turns the system into a sealed vessel.
Some failures are design failures. A drain installed above the slab is a code violation and a guarantee that water sits against the wall. A drain tied into a downspout system carrying far more water than the pipe was sized for will surcharge and back up. A drain that never had an outlet because the lot did not drain and nobody planned a sump is the most expensive version, because the fix means digging out the perimeter of a finished house.
Footing Drain vs. French Drain vs. Interior Drain
These three get confused constantly, and the confusion leads to the wrong fix. A footing drain is a code-required perimeter system at the base of a foundation, installed during construction, collecting groundwater at the footing. A French drain is a shallow yard drain that intercepts surface water and shallow groundwater, usually to solve a wet lawn or a soggy low spot. Our guide to installing a French drain covers that job, and it is a different excavation at a different depth for a different purpose.
If the foundation is still open, the exterior footing drain is the right answer and the cheapest moment to get it right. If the house is finished and the basement is wet, diagnosis matters more than product: check grading and downspouts first, then the outlet, then decide between exterior repair and an interior system.
Backfill and Final Grade
Backfill is where a good drain gets damaged. Heavy compaction equipment run against the wall can crush pipe and shift the stone envelope, and large rock dropped into the trench can puncture a coating and break a fitting. Place backfill in lifts, keep the heaviest equipment back from the wall, and compact with equipment suited to the space. Lift thickness is its own subject, covered in how thick compaction lifts should be, and the sequence around a foundation is covered in backfilling a foundation.
The final grade has to slope away from the wall, which is the surface half of the same strategy and is covered in how much slope a yard needs for drainage. If the excavation holds water, the drain gets installed in mud and the stone is contaminated before it is ever wrapped, so dewatering comes first: see dewatering an excavation.
Stone selection ties back to the same supply decision as every other drainage detail on the site: gravel and stone sizes explained. For the excavation that creates the space in the first place, start with excavating for a house foundation and excavating for a basement.